Module I · Algorithms & Flowcharts · Part 2
🎯 Why This Matters
In the last post, we wrote twelve algorithms as numbered steps with explicit Go to Step X jumps. That style is precise, but it asks your brain to hold a lot in working memory — you have to mentally trace which step leads where. A flowchart solves this by turning every one of those jumps into something you can literally follow with your eyes: an arrow.
A flowchart is simply the same algorithm, drawn as a diagram of connected shapes, where each shape has a fixed meaning and every arrow shows exactly which step comes next. Nothing about the underlying logic changes — a flowchart isn’t a different algorithm, it’s the same algorithm viewed a different way. In this post, we’ll take every one of the twelve algorithms from the last post and turn them into flowcharts, one at a time.
🔷 Flowchart Symbols: The Building Blocks
Just like an algorithm always starts with “Start” and ends with “Stop,” a flowchart uses a small, fixed set of shapes — and once you learn what each one means, you can read any flowchart, not just the ones in this post.
| Shape | Name | Meaning |
|---|---|---|
 | Terminal | Marks the Start or Stop of the flowchart — every flowchart has exactly one Start and at least one Stop |
 | Input / Output | Reading in a value (Input N) or displaying one (Print Result) |
 | Process | A calculation or assignment — anything that changes a value, like Sum = Sum + Counter |
 | Decision | A yes/no question with exactly two exits — this is where a flowchart branches |
 | Flow line | Shows the direction execution moves — connects every shape to the next one |
💡 The core rule of flowcharts: every “Go to Step X” from the algorithm post becomes an arrow here, and every “If… then…” becomes a diamond. A loop is simply an arrow that points backward, up to a diamond you’ve already passed. Once you can see that correspondence, reading a flowchart and reading its matching algorithm become the same skill.
1Area of a Rectangle
Algorithm recap: Start → Input Length, Width → Area = Length × Width → Print Area → Stop.
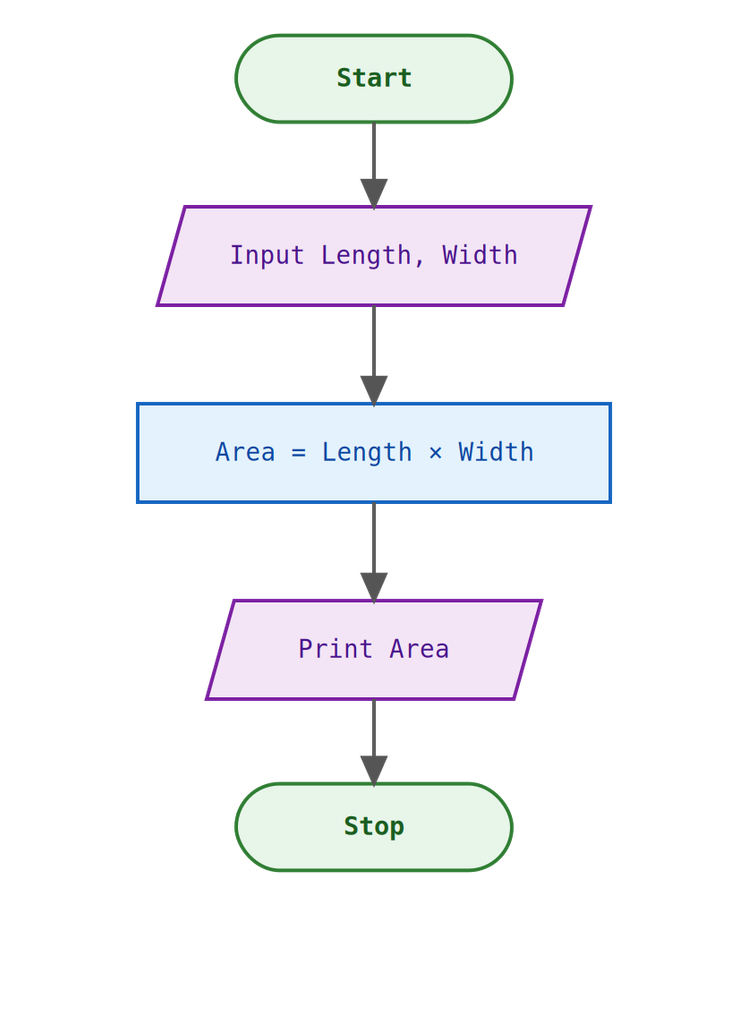
Reading this flowchart: Notice there isn’t a single diamond anywhere in this diagram — just a straight vertical chain of shapes. That’s the visual signature of a purely sequential algorithm: every shape has exactly one arrow in and one arrow out, and you can trace the whole flowchart top to bottom without your eyes ever needing to jump sideways.
2Add Two Numbers
Algorithm recap: Start → Input A, B → Sum = A + B → Print Sum → Stop.
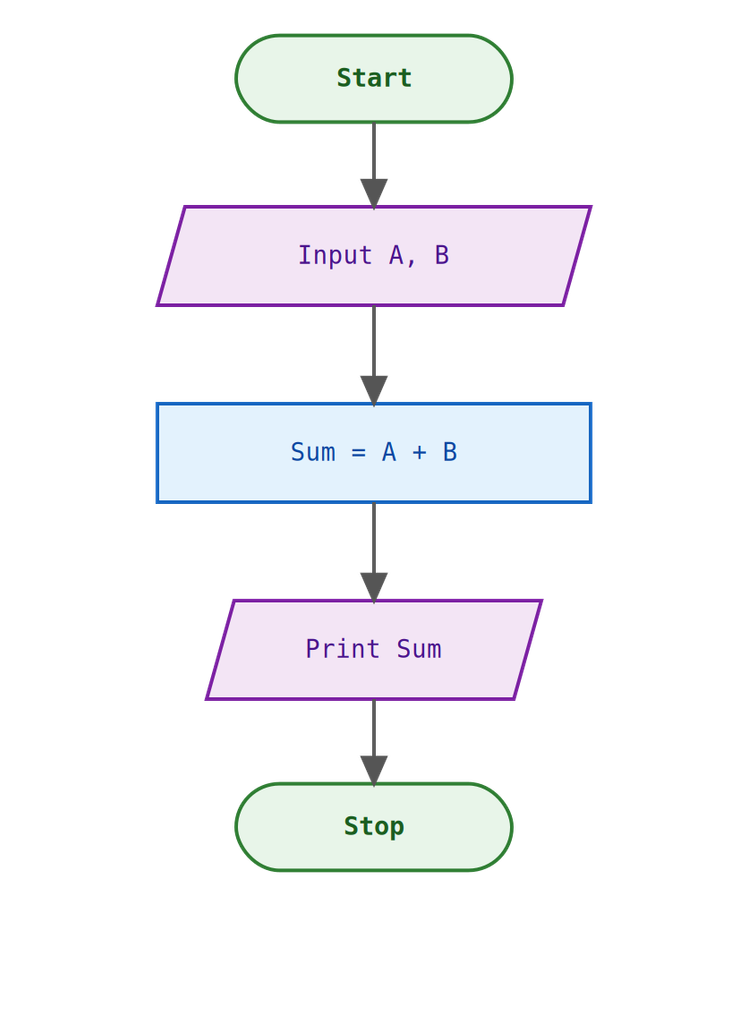
Reading this flowchart: Same shape as Algorithm 1 — a single straight chain. Seeing two different problems produce an identically-shaped flowchart is exactly the point: the shape of a flowchart reflects the shape of the logic, not the specific problem. Any purely sequential algorithm, no matter what it calculates, will always look like this.
3Largest of Two Numbers
Algorithm recap: Start → Input A, B → Is A > B? → (Yes: Print A is largest / No: Print B is largest) → Stop.
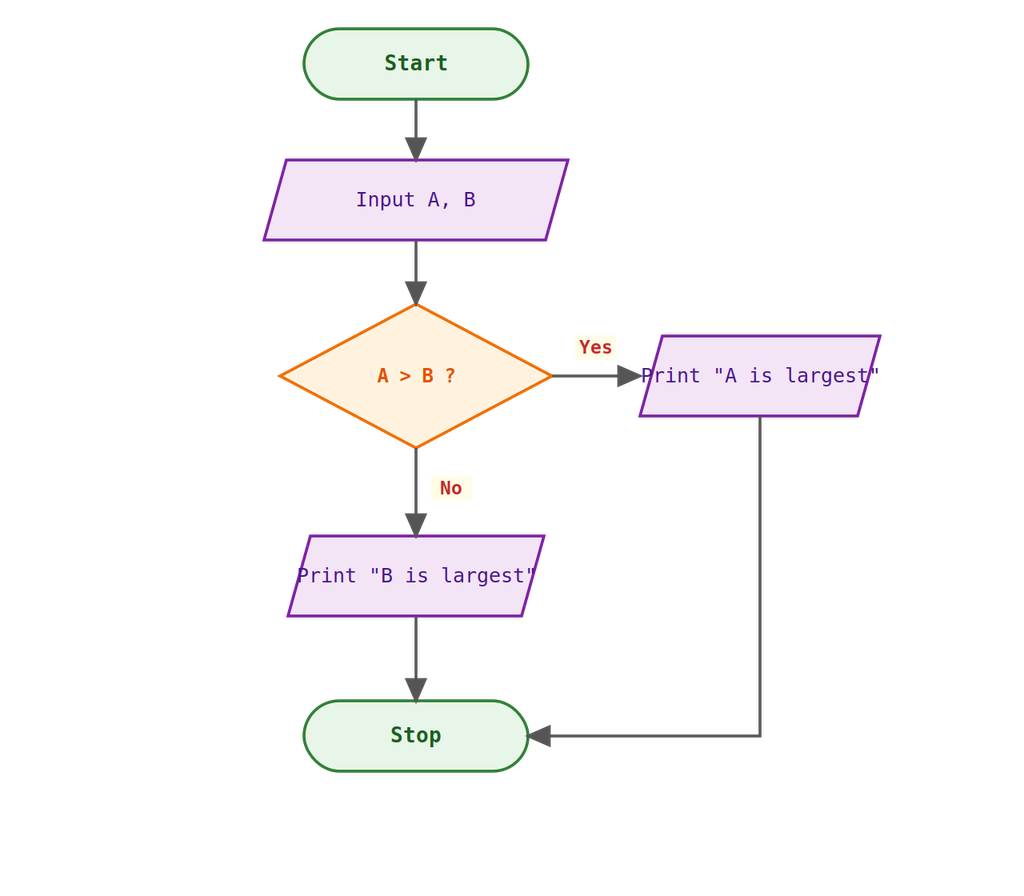
Reading this flowchart: This is the first diagram with a diamond — and notice it has exactly two arrows leaving it, labeled Yes and No, which is a strict rule for every decision diamond you’ll ever draw. Follow the “Yes” arrow and you reach “Print A is largest”; follow “No” and you reach “Print B is largest.” The two paths never run together — only one of them executes — and both eventually arrive at the same Stop.
4Largest of Three Numbers
Algorithm recap: Start → Input A, B, C → Is A > B? → if Yes, Is A > C? → if No, Is B > C? → three possible print outcomes → Stop.
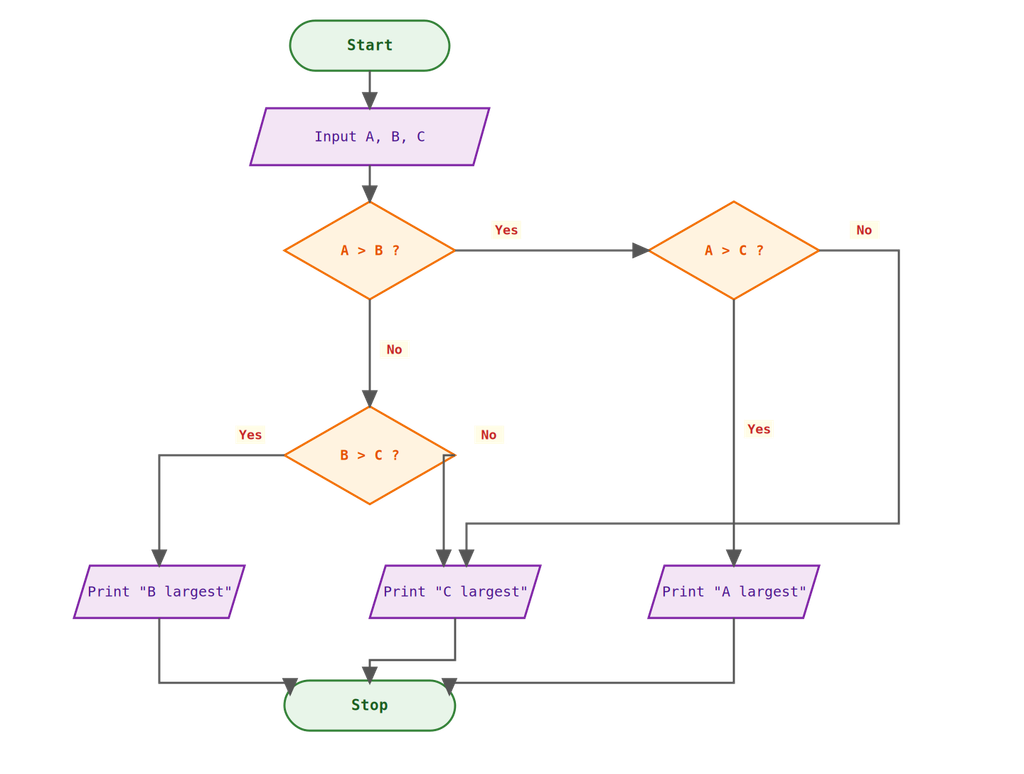
Reading this flowchart: This is a decision diamond feeding into another decision diamond — exactly the “nested if” from the algorithm post, now visible as a small tree of diamonds. Notice that “Print C is largest” has two arrows pointing into it, arriving from two completely different diamonds. That’s perfectly normal in a flowchart — a box can be reached from multiple paths, since both routes agree on the same conclusion (C is the largest).
5Odd or Even Checker
Algorithm recap: Start → Input N → R = N mod 2 → Is R = 0? → (Yes: Print Even / No: Print Odd) → Stop.
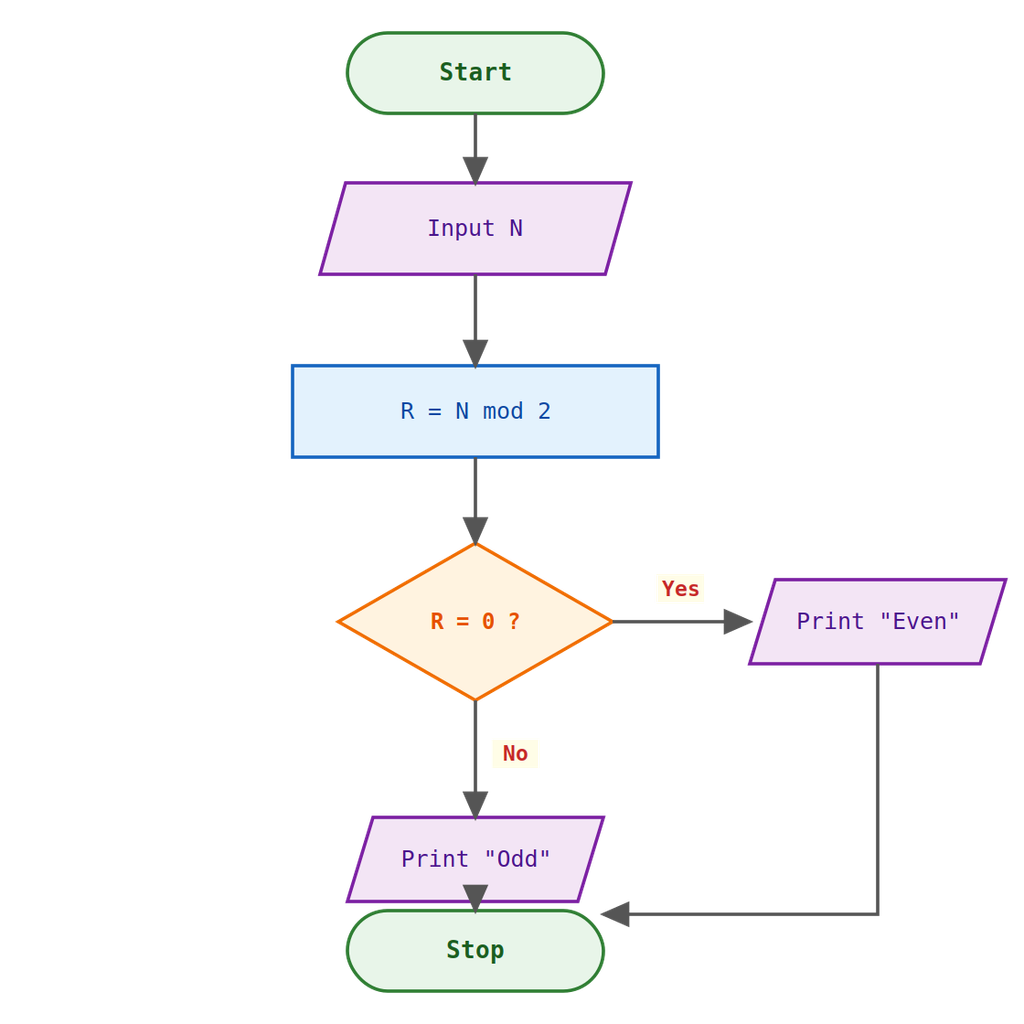
Reading this flowchart: Notice the process rectangle (R = N mod 2) sits between the input and the decision — the value has to be calculated before it can be tested. This ordering — input, then process, then decide — is one of the most common flowchart patterns you’ll see, because you almost always need to compute something before you can ask a yes/no question about it.
6Positive, Negative, or Zero Checker
Algorithm recap: Start → Input N → Is N > 0? → if No, Is N < 0? → three possible outcomes → Stop.
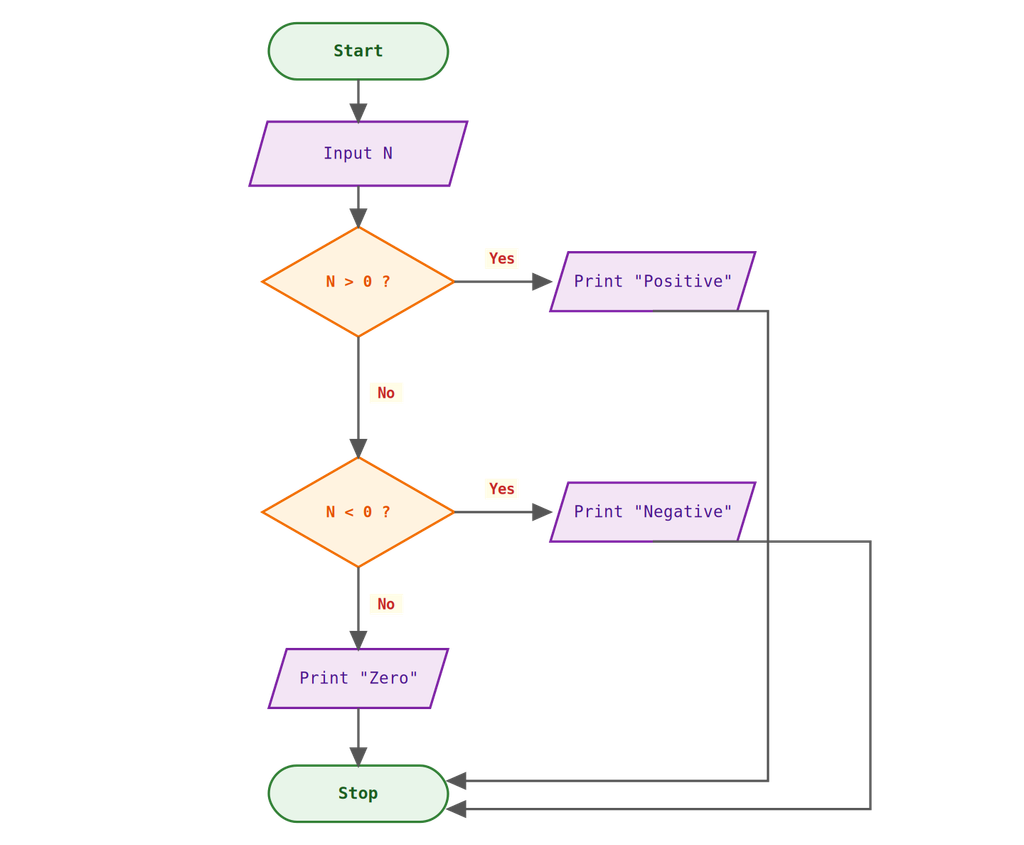
Reading this flowchart: This is two diamonds chained vertically — the second diamond only gets evaluated if the first one’s answer was “No.” Visually, this is exactly how the algorithm’s “fall-through” behaved: if a number isn’t positive, only then do we bother asking whether it’s negative. A three-way decision in a flowchart is almost always drawn as a short chain of two-way diamonds like this one, rather than one diamond with three exits.
7Leap Year Checker
Algorithm recap: Start → Input Y → Is Y mod 4 = 0? → if Yes, Is Y mod 100 = 0? → if Yes, Is Y mod 400 = 0? → Leap Year or Not a Leap Year → Stop.
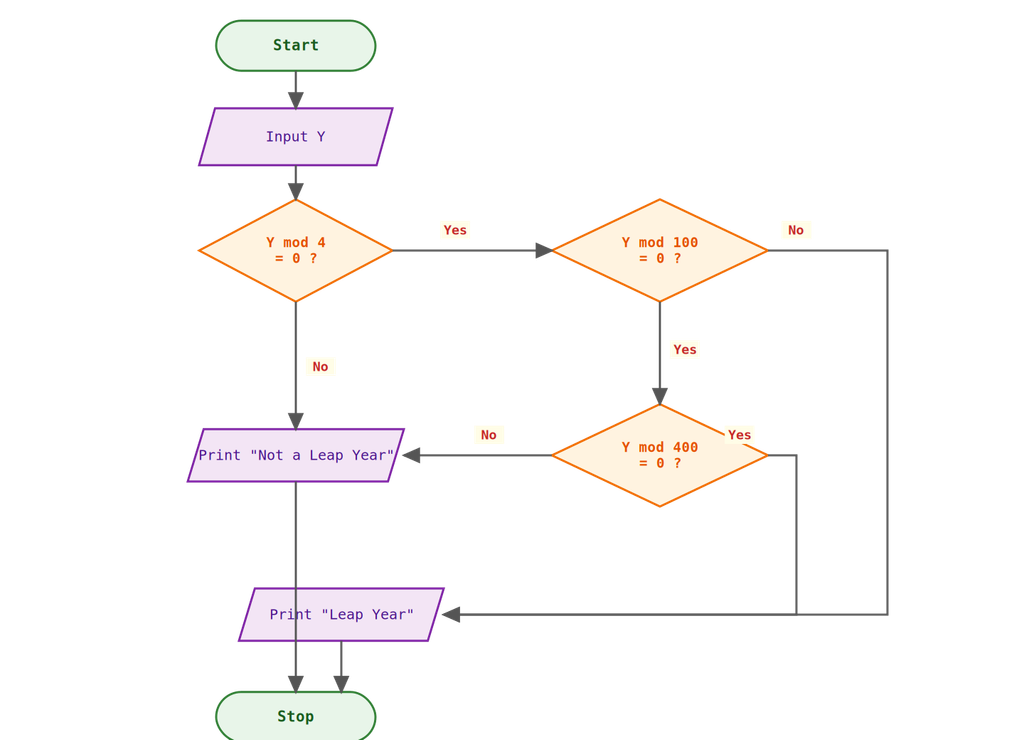
Reading this flowchart: Three diamonds deep — this is the most nested decision chain in this post. Trace the path for the year 2000 with your finger: Y mod 4 = 0 → Yes → Y mod 100 = 0 → Yes → Y mod 400 = 0 → Yes → Leap Year. Now trace 1900: Yes → Yes → No this time → Not a Leap Year. Notice “Leap Year” also has multiple incoming arrows — reached both when a year clears all three checks, and when it’s divisible by 4 but not by 100 at all (a much shorter path through the diagram).
8Sum of First N Natural Numbers
Algorithm recap: Start → Input N → Sum = 0, Counter = 1 → Is Counter > N? → if No, Sum = Sum + Counter, Counter = Counter + 1, then jump back → if Yes, Print Sum → Stop.
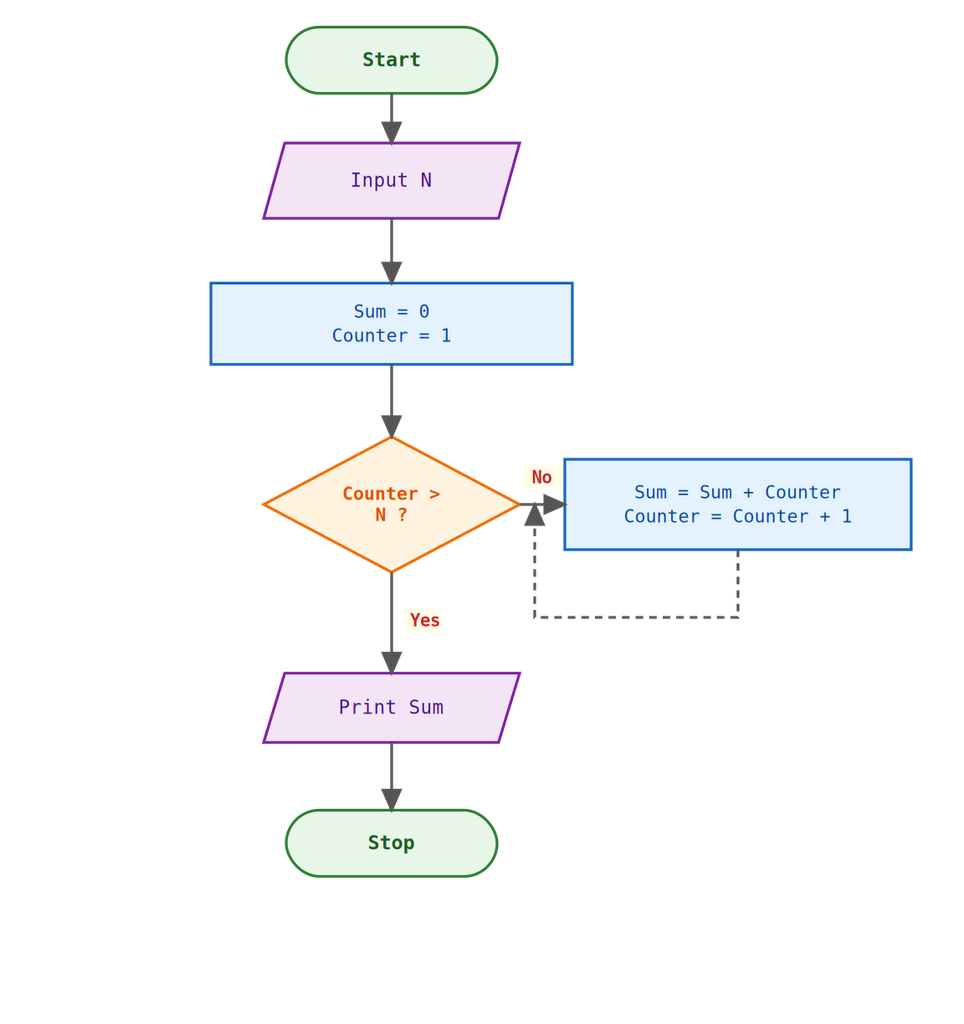
Reading this flowchart: Here’s our first loop — and you can see it instantly, because there’s a dashed arrow pointing backward, from the process box back up into the decision diamond it already passed through. This backward arrow is the entire visual definition of a loop: as long as the diamond’s answer is “No,” execution keeps flowing in a circle through the process box and back to the diamond, only escaping once the condition finally becomes “Yes.”
9Factorial of a Number
Algorithm recap: Start → Input N → Fact = 1, Counter = 1 → Is Counter > N? → if No, Fact = Fact × Counter, Counter = Counter + 1, then jump back → if Yes, Print Fact → Stop.
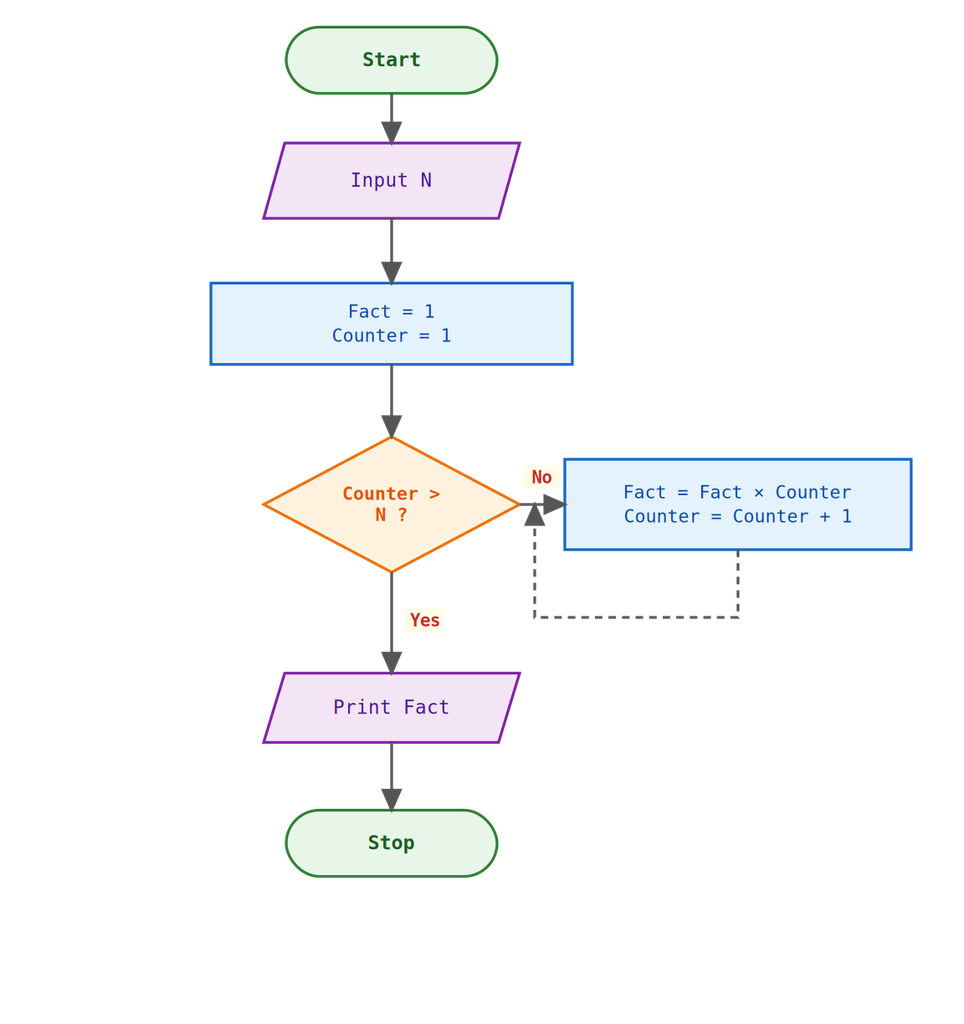
Reading this flowchart: Structurally identical to Algorithm 8’s flowchart — same diamond, same backward dashed arrow, same shape entirely. Only the label inside the process box changed, from addition to multiplication. This is a great visual confirmation of something we noted in the algorithm post: once you recognize the loop shape, the same diagram template solves many different problems.
10Prime Number Checker
Algorithm recap: Start → Input N → Is N ≤ 1? → Counter = 2 → Is Counter = N? → Is N mod Counter = 0? → Counter = Counter + 1 (loop back) → Print Prime or Not Prime → Stop.
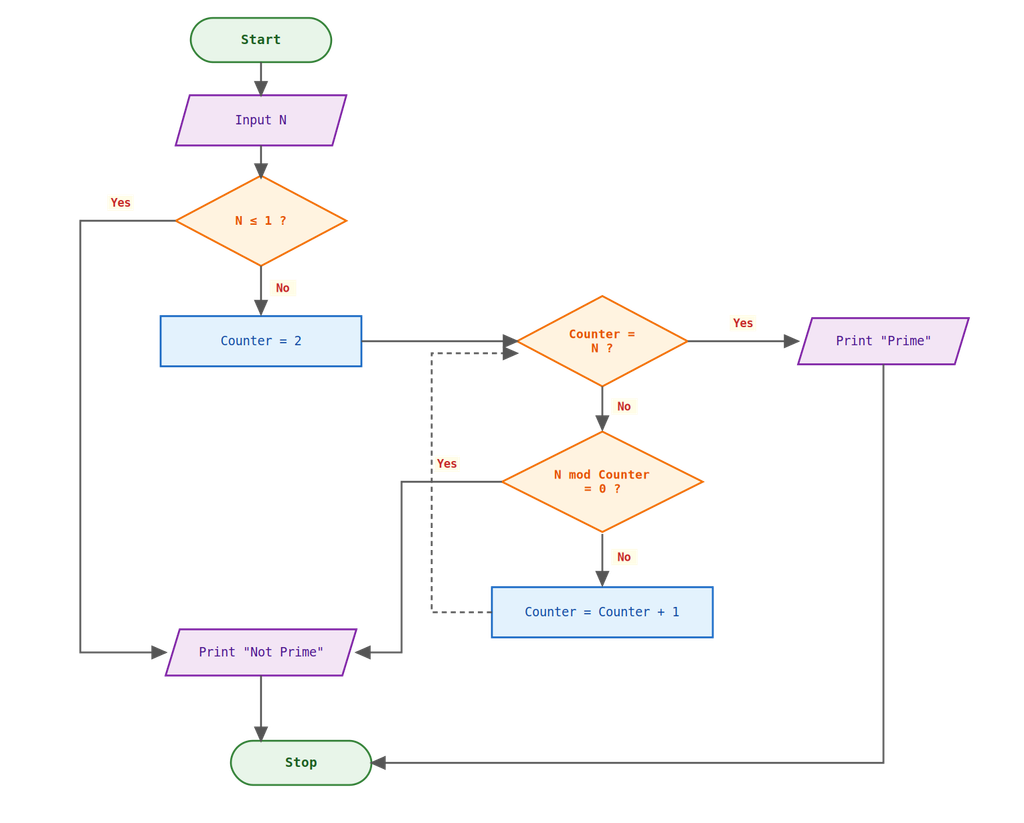
Reading this flowchart: This is the busiest diagram in the post, so trace it slowly. There are two separate paths into “Print Not Prime” — one directly from the very first check (numbers ≤ 1 are never prime), and one from deep inside the loop, the moment a divisor is found. That second path is the early exit: follow the “Yes” arrow out of “N mod Counter = 0?” and you’ll see it cuts straight across to “Print Not Prime,” completely skipping the rest of the loop. Meanwhile, the dashed arrow from “Counter = Counter + 1” loops back up into “Counter = N?” — exactly like Algorithms 8 and 9 — but this time the loop has a second exit door built into its side.
11Menu-Driven Simple Calculator
Algorithm recap: Start → Display Menu → Input Choice, A, B → check Choice against 1, 2, 3, 4 in sequence → run the matching operation → for division, check B = 0 first → Print Result or an error message → Stop.
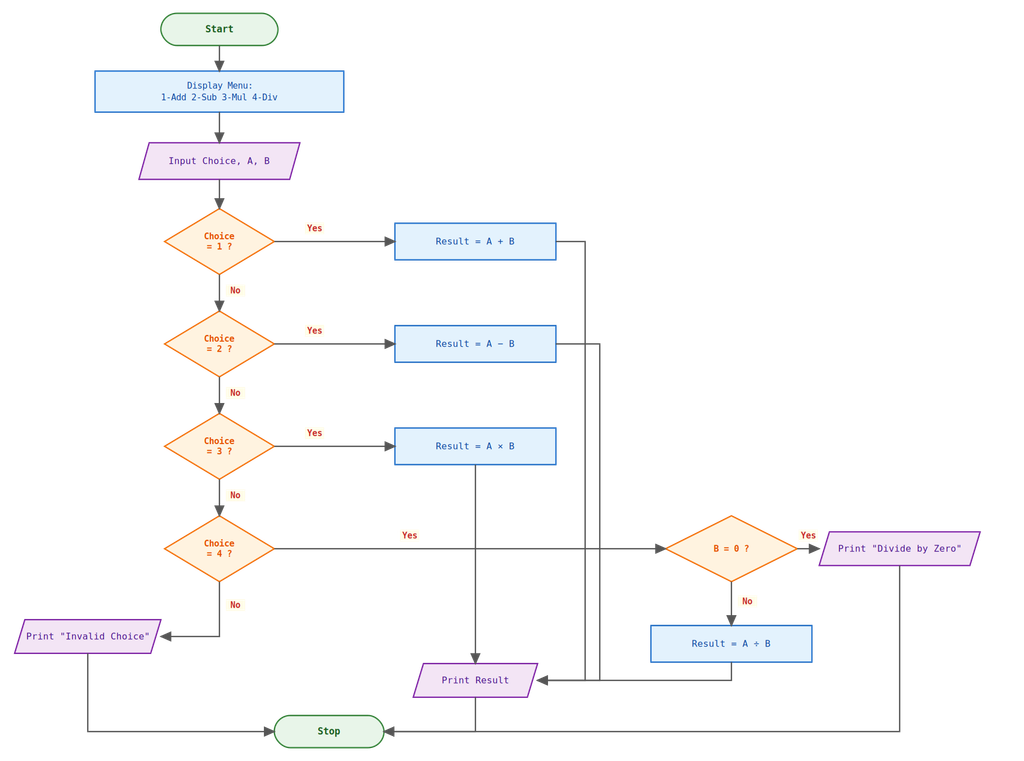
Reading this flowchart: This diagram ties together everything from this post. The four Choice diamonds are stacked like a ladder — each one only gets asked if the previous answer was “No,” exactly like the leap year checker’s chain, just longer. Notice “Print Result” has four separate incoming arrows — one from each arithmetic operation — while “Print Invalid Choice” and “Print Divide by Zero” both skip “Print Result” entirely and head straight to Stop. That’s the flowchart making something visually obvious that was easy to miss in the numbered-step version: error paths don’t need to pass through the “normal” ending — they’re allowed to shortcut straight to Stop.
12Print the Multiplication Table of a Number
Algorithm recap: Start → Input N → Counter = 1 → Is Counter > 10? → if No, Print N × Counter, Counter = Counter + 1, then jump back → if Yes, Stop.
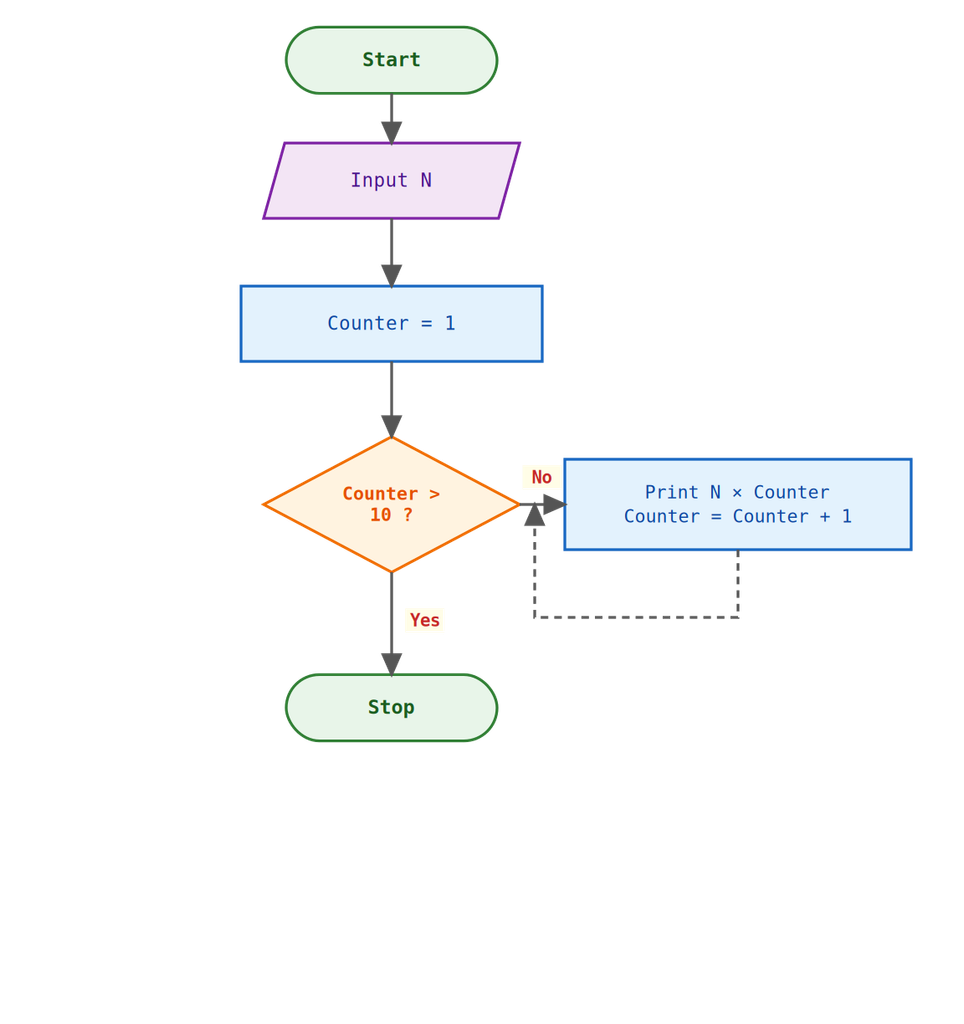
Reading this flowchart: The simplest loop shape in the whole post, closing things out the same way the algorithm post closed — with a single diamond, a single process box, and one dashed arrow looping back. Notice there’s no separate “Print Result” box after the loop ends this time — the printing happens inside the loop, once per pass, and the flowchart goes straight from “Counter > 10? Yes” to Stop. It’s worth comparing this shape side-by-side with Algorithm 8’s — same backward arrow, same diamond, but here the printing is inside the loop instead of waiting until after it.
📊 Algorithm vs. Flowchart: The Same Logic, Two Views
| Algorithm concept | Flowchart equivalent |
|---|---|
Step 1: Start / final Stop | Rounded terminal shapes |
Input X / Print X | Parallelogram shapes |
An assignment like Sum = Sum + Counter | Rectangle (process) shapes |
If condition, go to Step X; else go to Step Y | A diamond with a “Yes” arrow and a “No” arrow |
| A jump backward to an earlier step | A dashed arrow looping back up to an earlier diamond |
| An early exit jump out of a loop | A second arrow leaving a diamond inside the loop, bypassing the rest of it |
💡 The big takeaway: Nothing was invented in this post — every single diagram is just a direct redrawing of an algorithm from Part 1. If you can already write the numbered-step version confidently, you already know how to build the flowchart; you’re just learning a new, more visual vocabulary for saying the exact same thing.
🎓 Practice Exercises
Exercise 1: Match Them Up
Without looking back, try to sketch the flowchart for Algorithm 6 (Positive/Negative/Zero) from memory, using only two diamonds. Then compare your sketch to the one above.
Exercise 2: Spot the Loop
Out of all twelve flowcharts in this post, four contain a dashed backward arrow. Can you name all four without scrolling back up?
Exercise 3: Redraw With a Change
Algorithm 12’s flowchart prints inside the loop. Redraw it so that it instead builds up a single line of text and prints the whole table only once, after the loop ends — similar to how Algorithm 8 waits until after its loop to print.
❓ Frequently Asked Questions
Q: Does a flowchart replace the numbered-step algorithm, or do I need both?
They’re two views of the same thing, not a replacement. Many programmers sketch a rough algorithm first to nail down the logic, then draw the flowchart to double check the flow visually — and some prefer to design in flowcharts directly. Either order works; what matters is that both describe identical logic.
Q: Why does a decision diamond always have exactly two exits?
Because every decision in a flowchart is a yes/no (true/false) question by convention. A three-way decision, like Algorithm 6, isn’t drawn as one diamond with three exits — it’s built from two diamonds chained together, each still asking a plain yes/no question.
Q: Can a flowchart have more than one Start or Stop shape?
A flowchart should have exactly one Start, but it’s completely normal to have multiple Stop shapes — or multiple arrows converging into one shared Stop, as almost every diagram in this post does. What’s not allowed is a path that never reaches any Stop at all.
Q: What’s actually gained by drawing this instead of just writing the algorithm?
Flowcharts make certain mistakes far easier to catch by eye — a missing arrow, a diamond with only one exit, or a loop that never actually reaches its exit condition all tend to jump out visually in a diagram in a way they don’t in a wall of numbered text. That’s exactly why professional software design still uses flowcharts today, even though nobody codes by literally reading one line by line.
✅ Key Takeaways
- A flowchart is the same algorithm as before, redrawn using a small fixed set of shapes: terminals, input/output parallelograms, process rectangles, and decision diamonds — connected by arrows.
- Every decision diamond has exactly two exits, labeled Yes and No — a three-way or four-way decision is always built from several two-way diamonds chained together.
- A loop is instantly recognizable in a flowchart as a dashed arrow pointing backward into a diamond the flow already passed through.
- An early exit shows up as a second path leaving a diamond inside a loop that bypasses the rest of the loop entirely, heading straight for the ending.
- Multiple arrows are allowed to converge into the same shape — this is common wherever different conditions lead to the same conclusion, or where error paths skip ahead straight to Stop.
🚀 Next up: Now that you can read and draw flowcharts confidently, we’ll introduce Flowgorithm — free software that lets you build these exact diagrams on screen and actually run them, watching the flow highlight in real time as it executes, before converting your flowchart straight into C source code.